Thursday, December 29, 2011

Teach & Learn III - Hydroponics using Passive Aeration

C. PASSIVE AERATION SYSTEM (HYDROPONICS)

HYDROPONICS is the process of growing plants in sand, water or gravel with added nutrients, BUT w/o soil. Origin is from the 1930’s, the word comes from “hydro” which means “water”, and Greek “ponos” which means “labor” .

In the olden days, it was discovered that plants may thrive in  medium other than soil when essential nutrients are met. They found out that plants utilize the minerals from soil when it is watered because water dissolves the minerals in soil thereby allowing the plants to absorb it. And so, if the right amount of nutrient is given, the soil may be taken away, so the soil is just incidental to plant growth.

For my Hydro system, I utilize the SNAP Solution (A & B) from UPLB College of Agriculture thru its authorized distributors. SNAP stands for Simple Nutrient Addition Process, which simply means, the right amount of minerals & nutrient is supplied to the plants enabling it to thrive in a soil-less condition.

Materials needed: 
SNAP Solution A & B, seedling plugs (styro cup w/ seedlings), water (10-12L), large vessel or container, Growing bottles w/ holes, mosquito net (optional)  

Procedure:
·      Fill a huge container (such as mineral water gallon) with 10-12 Liters of water, add 25ml of SNAP A and mix thoroughly. Then add equal amount of SNAP B (25 ml) to the same solution and stir well.
·      Pour the solution in each growing bottles. Estimate by putting the seedling plug, and seeing to it that the bottom of the cup touches the nutrient solution by at least ¼ to ½ inch deep. Not more, not less.


·      Do the same with the rest of the growing bottles.
·       
·      Set-up the Hydro in a place where it will receive the earliest morning sunshine, and away from the rain. A roof awning is nice, but if this is not possible, a simple plastic sheet to act as a transparent shed will do.
·       
·      Secure the plants from insect larvae and other leaf-eating pest by putting an old mosquito net. This also saves you from visiting your garden very early in the morning most esp. when you get busy during weekdays and you don’t have time to spare to even take a peek.


NOTES:
·      Expect the nutrient solution level to recede faster when the plants are much bigger than when they were seedlings.
·      Using this bottle set-up, replenish using fresh nutrient solution when its level has gone down by more than half an inch below the styro cup bottom; however NEVER allow the level of the solution to touch again the bottom of the styro cup.
·      Maintain the nutrient solution by at least ½ or ¼ inch BELOW the styro cup bottom.

Hope you like this post.


·       

Teach & Learn II - Seedling Plugs

B. SEEDLING PLUGS
A seedling plug is an individual growing cup where seedling is transplanted and allowed to grow in the growing box, or in this case, a cola bottle.

Materials needed: styro cup (8oz), growing medium (mine is vermi), knife or cutter, seedlings, barbecue stick or chopsticks

Procedure:
·      Using a knife (I still prefer serrated) or cutter, hold your styro cup and make 8 cuts, about 1 inch long at the side and ½ inch at the bottom. (see diagram below)


·      Fill each cup w/ growing media (of your choice, whichever is applicable) about 1 inch thick.
·      Transplant seedlings from the sowing tray with TLC (tender loving care). May use barbecue stick or chopstick to uproot each seedling.
·      Transfer only 1 seedling per cup, and spray it w/ water carefully and lightly.


·      Seedling is ready for transplant 10 days after germination or when about 2-3 true leaves have shown up.
·      Label the seedling appropriately.


Teach & Learn I -Growing Container (using Cola Bottles)

As an educator, I teach students so that they are able to learn new things. But I also tell them that, “to be able to learn, one must empty his cup so that it can be filled again”, because a full cup cannot be filled anymore.

To learn much, one must “unlearn and then re-learn”.
So now, it’s time to teach & learn this wonderful hobby called Gardening.

For my Modified Hydro Garden:

It’s “modified” because I used:

   1. recycled material (such as softdrink bottles, used styro & plastic cups) instead of the traditional PVC pipes
       
   2. Vermicompost as growing medium instead of perlite crystals, coco coir dust, gravel or clay pellets
       
   3. Mosquito net to protect my seedlings as I cannot afford to wake up that early to inspect them for insect larva or any pest.

   4. Passive aeration to avoid unnecessary electric consumption & accidents brought about by pumps.

PREPARATION:

A. GROWING CONTAINERS (using COLA BOTTLES)
Materials needed:
softdrink plastic bottles (preferably 2L size), marker pen, scissors, serrated knife (will explain later why), top of milk tin can

Procedure: All you have to do is: Mark, Cut and Fold

MARK
·      For each bottle, you can make 2 holes (one at the bottom and near the top end).
·      Starting from about 1-2 inches from the bottom end, make about 8 dash marks(@6 &12, 3 & 9, 11 & 2, 5 & 8 o’clock) using the top of milk tin can.  
·      Do the same for the hole near the top end, avoiding the slope of the bottle.


CUT & FOLD
·      Position the serrated knife along the 6 & 12 o’clock mark on the bottle and make about an inch slice or cut using a “saw-like” technique. 


  Serrated knife is better bec it “grips or bites” easily onto the plastic bottle unlike fine knives which slips & might cut your hand.
·      Using your scissors, cut through until the you reach the marks making your hole looks like a “pizza”.


about an inch cut
            Each cut now looks like tiny triangles, about 8 of them.
Fold each “triangle” inwards, and voila! You now have a hole for your seedling plugs.


·    


Tuesday, December 27, 2011

Trying Hard Gardener strikes back

Now, i'm posting veggies that i tried sowing. Enjoy viewing!

trellis for cucumber

trellis infront of the papaya

upo (gourd)

my veggie patch starts here
tomato seedling


solitary tomato 

tomato peeping out

okra


passion fruit

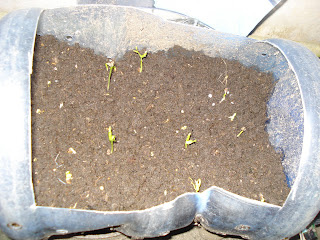
sweet bell pepper in vermicompost

Django pepper in vermicompost

chitted potato

potato sprouting

bitter gourd (ampalaya)


alugbati

carrots on the rise

cucumber & pechay sharing the same container

eggplant


upland kangkong waking up from deep slumber

american lemon & ginger in 1 pot


“Urban Container Gardening ala Hydro”


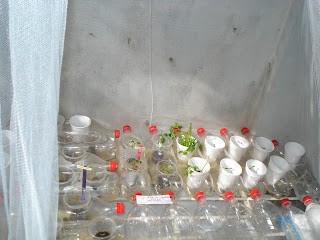
On Dec. 2, 2011 - I finally mounted my own version of “Urban Container Gardening ala Hydro” :D

My own version consist of empty softdrink plastic bottles.

I wanna support Mr. Rom on his just cause:
·       
·      that “waste materials can be converted into something useful.”  

these are lettuces


iceberg lettuce


hydro set-up w/ mosquito net

·      my hydro set-up is unique- it has mosquito net (heheheh) to protect it from insects.

i liked it!